This is a dream come true – I am so excited and honored to announce that I am on the new Brutus Monroe Inspiration Team! I am so looking forward to working with all these talented and amazing crafters!
If you haven’t checked out the Brutus Monroe site yet, please head over there and see all the goodies they have!
I haven’t been active on my blog for over a year, but stay tuned for more some posts and inspiration! My husband and I moved last year, and it took quite a while to get my Craft Room set up and just how I wanted it. It is finally done, and I am ready to share and get inky!
Welcome back! Two videos in one day! I had the time today so I wanted to share this fall card I made using some items from the Brutus Monroe September 2019 Inspiration Box, along with some Aqua Pigments and Nuvo Gilding Flakes.
I think gilding flakes are BEAUTIFUL, but they are so messy! If you check out my video below, you’ll even see how they can be used as part of your manicure lol 🙂 ….I found that out by accident.
One of the things that I will recommend is that when using gilding flakes, use small amounts at a time for a nice thin layer. I used a handful and it was way messier than it needed to be. But, it still worked out in the end.
Here’s the video for more information!
Thank you for checking out my blog, I hope you enjoyed! ❤
Hello all and welcome back! I had a few requests after my first Craft Room Tour video to show more detail. Please check out my YouTube video below for an indepth look into some of the drawers and organization in my craft room!
If you haven’t seen my original Craft Room Tour, you can check that out here, it has a view of the entire room and all my cabinets, shelves and drawers!
Thank you for stopping by and I hope you have a wonderful day! ❤
Hello and welcome back! Today I’m sharing a quick card and video using some ink blending to create a focal point. This techinque can be used to make a really beautiful one-layer card (although I did pop this panel up on foam tape, it could have just been made using the card base). I used both regular Distress Ink and Distress Oxide Ink to make this background – I used Distress Ink in Antique Linen to blend over the whole background panel using the Taylored Expressions Blending Brushes, then cut out a mask/stencil with an oval die and used the Distress Oxide Ink in Faded Denim – concentrating the darkest color around the edges and letting it get lighter towards the center.
Hello! Thank you for coming back to my blog – how cute are these fish?! This is the Hero Arts Color Layering Goldfish stamp set. On this card, I did some ink blending, some embellishing of a laminating sheet (inspired by Jennifer McGuire!) and some die cutting! I had so much fun with this card – it was for my dad’s birthday.
I tried out the technique that Jennifer McGuire used in one of her recent videos with embellishing laminating sheets to make pretty, decorated windows. I added some ink to the inside of the laminating sheets prior to sprinkling embossing powder and I love the look it gave! The ink kind of bunched up in certain areas and made it look more like bubble and waves.
I used the Taylored Expressions Blending Brushes to ink blend distress oxides onto the frame panel and also around the edges of the card base. I didn’t have heavyweight cardstock in the color that I wanted, so I blended some ink onto the white card base to match. The brushes make ink blending a breeze! They really help get a soft, blended look without harsh lines. And look how cute they are! They look great sitting on my craft desk. 🙂
Taylored Expressions Blending Brushes and Brush Caddy
Please check out my YouTube video for more information! If you enjoy the video, please give a thumbs up and subscribe!
Welcome back! Thanks for joining me again – how awesome is this stamp?! I knew as soon as I saw it that I wanted to watercolor it. And using the Brutus Monroe Aqua Pigments are so much fun! Especially since there was a limited edition set for Halloween that came in little skull jars – so freakin’ cute!
I also used the Brutus Monroe Squeaky Clean Dispenser, but not for stamp cleaner as it is intended, but with plain water in it to help clean my brush in between colors. Thanks Kara for that tip! It is so nice, you can pump a little water up in to the top reservoir and use until dirty and then just sop it up with a towel. A couple pumps of the dispenser and your reservoir has clean water in it again!
Please check out my YouTube video below for more details!
Thank you for checking out my page and be sure to check out my Instagram as well for more cards and projects! (….and puppies and kittens 🙂 )
Hey everyone! I was so excited when my Trick or Treat Card Kit from Brutus Monroe came in the mail a couple days ago! Now, this is sold out (sorry!), but a lot of the pieces from the kit are still available for sale individually.
Check out those shimmery bats! Wondering how that happened with a stencil?! Well…the answer is with Chroma Glaze and Opal DecoFoil! Check out the video for more info:
If you interested in any of these products, check out the Brutus Monroe site!
Hello!! Thank you so much for joining me again! Today, I wanted to share my craft room with you! I have linked the YouTube video tour down below, but please check out the rest of this post for some more details!
Here is the video if you’d like to head over to YouTube to check it out:
Check out my video tour here!
I have posted some pics below detailing some of my organization :
Small card catalog – embellishment storage
When I first started organizing my embellishments in here, I thought ice cube trays would be a great way to separate/organize the little pieces. When the idea hit me, I needed to get it done right away! The store in my town did not have white ice cube trays, I could only find these blue ones. So, I just spray painted them white to help the colors of the embellishments stand out. I could have probably waited and bought white ones, and it would have looked better, but oh well. It works!
I had to throw this pic in here because Ralphie is just exhausted and can’t handle it anymore – he is just too much sometimes, the drama!
This section of drawers is just to the left of my work desk, so I have some things here that I use frequently, such as glitter, Zig Clean Color and Arteza Markers, Rhinestones/Pearls.
The very bottom shelf here has 12×12 paper pads stacked all the way to the left and then some 12×12 paper packs and kits in the standing organizers. Zig Clean Color Real Brush and Arteza Markers
A lot of these white drawers are still empty! How exciting is that?! Room to fill with fun, new crafty stuff! This drawer is full of rhinestones and pearls in a plastic insert to help separate and organize.
The clear plastic organizers were from Pat Catans and I love them for my glitter. They have lids that screw on and I like having them in little containers that make it easier to sprinkle onto my projects. I also LOOOVVVEEE just looking at glitter 🙂 So I can pull out a container and just stare at the sparkle.
Glitter!!!
Thank you for joining me today! I will leave you with a couple pictures of my crafting companions…
StellaI have some animal themed stamp on top of this card catalog as decoration…and Violet loves to lay up there behind them. ….she also likes to push stuff off the top, so I have to be careful with placement of my trash can below. I have lost some craft items before and am pretty sure that she threw them away!
Hey! Thanks for coming back to my blog! I wanted to add a few more comments about the Brutus Monroe Create Your Own Ending Event – I was so long winded on my first post that I didn’t even make it to talking about the last day of the event!
Our last day of the event, we received a bottle of the new Squeaky Clean stamp cleaner in the limited edition, Sweet Pumpkin Spice scent – O. M. G. is this scent amazing – why not have a great stamp cleaner that fills your craft room with the sweet spicy goodness of fall?!! The supplies are limited, so if you want to grab yourself a bottle (or four), head over to the Brutus Monroe site now – once it is gone it’s gone! If you aren’t a member of their rewards program, check that out here, and sign up – you can get $10 off your first order, and points rack up quickly!
One of my favorite things we played with on our last day of the event were the Color Burst Watercolor Powders. So much fun! We each received two bottles of these in our Class box for the day – I originally had the Merlot and Solar Flare – but a sweet, sweet friend that I met at the event traded me for the Merlot so I ended up with a purple! Thanks DiDi! (have I mentioned how everyone at this event was so sweet and kind and a pleasure to meet and hang out with?!). I have had some color burst powders in my collection for a while now, and will admit that I hardly used them because I wasn’t sure exactly what to do with them. But I learned some techniques that I definitely will be continuing to practice here in the near future. I LOVED these tags that we made – what we did was sprinkle some color burst powder onto a dry tag, near the top. Then spray the pigments with water, lift up and let it drip down! Not only did it make beautiful drips down the page, but it also made some little speckles and splatters of color all over the background. LOVE.
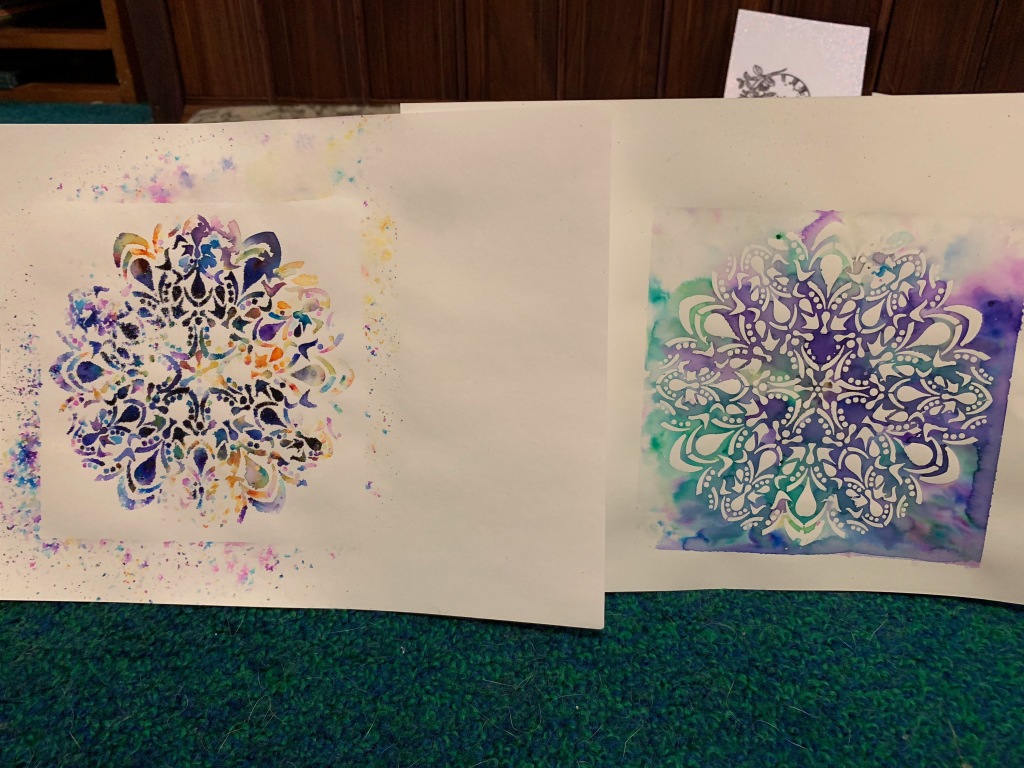
Another technique we practiced with the Color Burst powders, was using it through a stencil. I absolutely loved the effects. You’ll need some cardstock, a stencil, some color burst powders and a spray bottle for this technique. First, you will lay your stencil down onto your paper (and it will work better if you spray your stencil with the ThermoWeb Pixie Spray first) and then drop some Color Burst powders onto your paper/stencil – do not squeeze the bottle! All you need is to gently shake or tap the bottom, if you squeeze, you will get way more powder than you bargained for! After you feel like you have enough powder on there, start spritzing! You will want to have another sheet of cardstock ready, because when you left up your stencil, you can then place it wet side down onto a new sheet of cardstock. I found it helpful to then get a paper towel and put over the stencil and blot up excess liquid while it is still on your cardstock. I think the effect from the second print was my favorite.
The print on the left is what I got from placing the stencil down on paper, putting some Color Burst powder on and spritzing it. The one on the right, is the print I got after pulling up the stencil from the first one and laying it wet side down on another sheet of cardstock and then blotting with a paper towel (while stencil is still in place). (I just realized that these two prints in the above picture are actually from two separate sessions, different colors!)
You can find all the products for these techniques (as well as the Sweet Pumpkin Spice Squeaky Clean!) over at the Brutus Monroe website, be sure to sign up for their rewards program if you haven’t yet! If you haven’t signed up yet, you can get $10 off a $50 purchase by using this link and signing up!
Thanks for coming to hang out with me again! I think I am planning on a craft room tour coming up!